

Photo: Amanda Bowen, RRBG Photography
We are a quarter of the way through the first season of the Barry Trotz era. The process has been solid, the results have been decent, and the lineup decisions have, at times, been confusing.
Trotz is the Caps’ fourth coach since 2011, so fans are well aware that a change in coach means a change in tactics. With that in mind, I’m going to take a look at the Caps’ breakout under Trotz.
For those who don’t know what a “breakout” is, it is essentially the way a team exits the defensive zone. It is the start of the transition from defense to offense.
Teams generally have multiple approaches to their breakout. Hockey is a fluid game; there are variations and contingencies in every game. Those variations depend on how the opponent might disrupt the breakout or where teammates are positioned when their team gets possession.
That being said, if you watch a team over a period of many games, you can get an idea of how they try to break out of the zone most of the time.
For the sake of simplicity, I’m going to look at how the Caps breakout of their zone in two different scenarios: Uncontested breakouts and contested breakouts.
- Uncontested breakout: When the Caps are breaking out under little to no forecheck pressure. An uncontested breakout is most common when the Caps gain possession of the puck after the opponent has dumped the puck into the Caps defensive zone for a line change.
- Contested breakout: When the Caps are breaking out under concerted forecheck pressure. A contested breakout is most likely when the Caps gain possession of the puck after the opponent was on attack in the Caps defensive zone.
In both types of breakouts, the Caps’ objective is to get the puck to a player at center ice as as soon it has reached their blue line. Those familiar with hockey strategies will note this is a very common tactic.
Uncontested Breakout
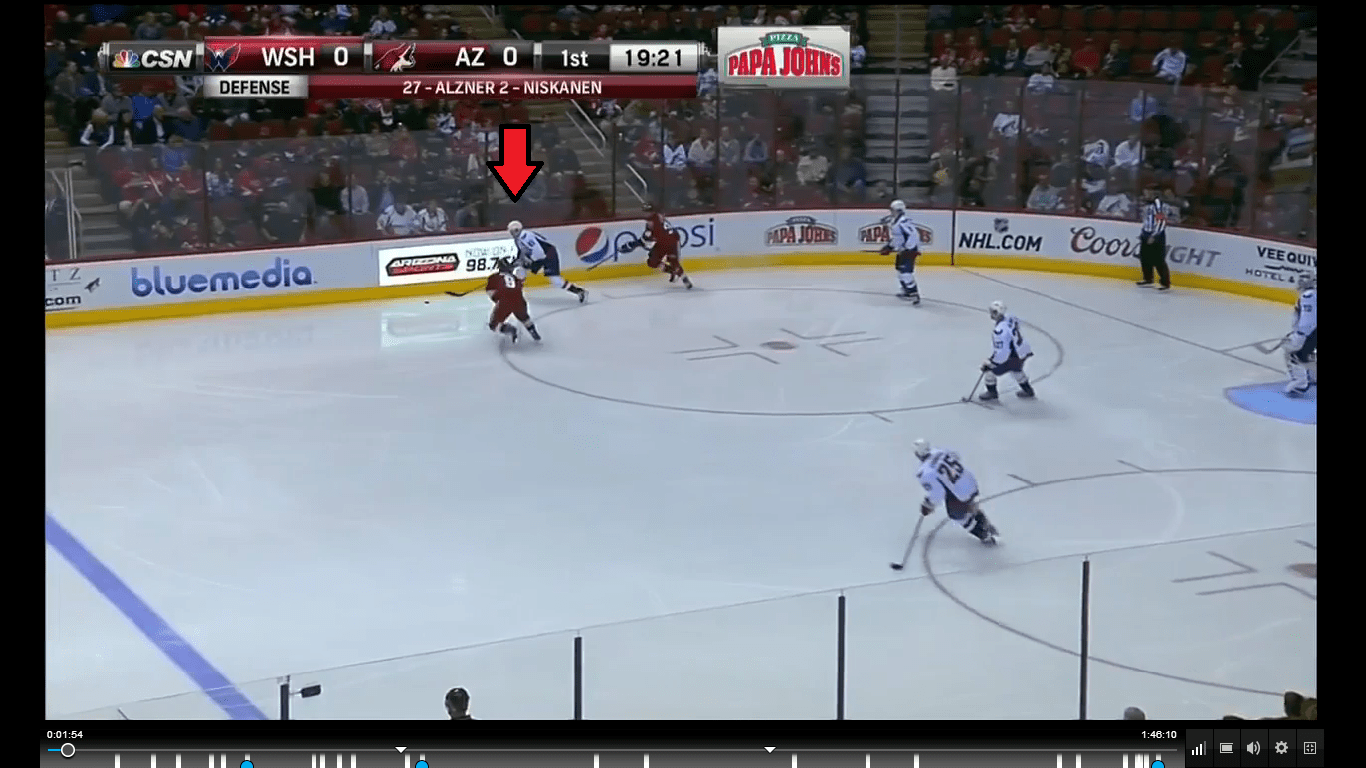
The goal of getting the puck to the center of the ice in the neutral zone is easier in an uncontested breakout because the opponent is not forechecking. You will often see the Caps start an uncontested breakout with a D-to-D pass.
(I’ve chosen an uncontested breakout with a little forecheck pressure so you don’t think there is never any pressure in uncontested breakouts.)
In the uncontested breakout below, Mike Green gathers in the puck and makes a D to D pass to his partner, Nate Schmidt. Green was under a little pressure when he made this pass, but the Caps try to make this D-to-D pass in uncontested breakouts even when there is no forechecker.

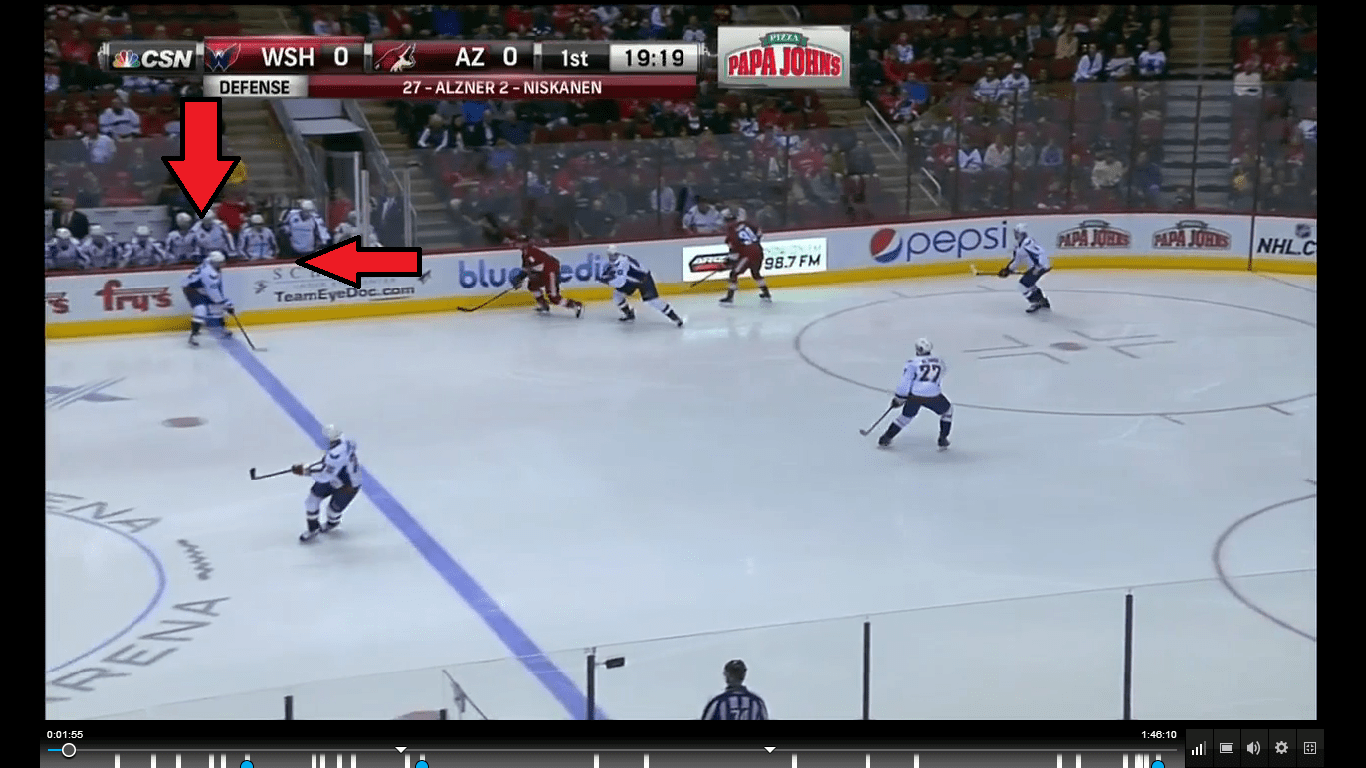
Schmidt then looks up ice to hit a forward with a pass. Think of this like a quarterback in football looking for receivers.
The Caps’ first read is the Center in the middle of the ice. In this case, Evgeny Kuznetsov is in the middle of the ice and open for a pass, so the Caps are able to quickly get the puck to the preferred spot.

Schmidt looks for Kuznetosv, who has begun turning up ice to receive the pass. In situations where the Center is not in position or not open, the Caps have two primary “check down” options. The Caps D will back off and pass it back to his partner or look for a cross-ice pass to a winger, depending on what is available.

Pass made, uncontested breakout complete.
Contested Breakout
Now, breaking out under pressure. There are a lot of variations to this one. I’ve chosen a contested breakout that features some alterations in order to show how different factors can result in variations to the plan.
Here, Jay Beagle has the puck on the half wall, by the hash marks by the boards. Often, a Caps forward receives a pass from a defenseman on the half wall to begin the breakout. In this case, Beagle has picked up a rebound steered there, likely intentionally, by Braden Holtby.
The Caps’ first option is to go up the boards to a forward at the blue line, which Beagle does in passing to Joel Ward.
Under ideal circumstances, Jason Chimera (the guy in the middle of the ice at the blue line) is closer to Ward and moving up ice for a quick pass to complete the breakout. In the scenario above, the breakout started so quickly off the rebound that Chimera doesn’t have time to get over. This isn’t a knock on Chimera; it happens many times per game. A lot of the time, the winger with the puck (Ward) will still make the pass to Chimera, but it is more of a cross-ice pass rather than a short, direct pass. Ward opts to “check down” and not do that here, perhaps due to something that Arizona players not pictured are doing to make that pass to Chimera less appealing.
So Ward chooses to pass to Karl Alzner, who has wisely stepped up to make himself available for a pass.

Even though Ward had to check down, the Caps still ended up getting the puck to the center of the ice, which seems to be what they prefer when coming through the neutral zone after a defensive zone breakout.
I’ve noticed something in Caps’ contested breakouts that is a little concerning.
If, in the above contested breakout, Chimera had made his way closer to Ward and received the pass, which seems to be the preferred plan, Chimera would have been headed up ice with the puck by himself.
The forward at the blue line (Ward) is often stationary, and the forward from the half wall (Beagle) has started up ice but is behind the play. Because of that, the forward who gets the puck in the middle of the ice would likely enter the zone well ahead of his teammates.
A lack of passing options often leads to more dump-ins than carries.
While every team dumps the puck plenty of times throughout a game, carrying the puck in is preferred because it generates more shots, so a breakout that usually results in dump-ins is not optimal. I’d need to watch more games to reach to a firmer conclusion, but that’s my main concern about the breakout at this point.
There are a lot of variations in hockey tactics in general and the contested breakout specifically, so please share things you’ve noticed in the comments below.
Follow Pat Holden and his blog Brooks Laichyear on Twitter.


